Should I fresh water flush my outboard engine?
The easy answer to this question is a very definite “yes”. For a bit more detail on why and how read on.
Why Fresh Water Flushing Your Outboard Engine and How to Flush It? – topics covered in this post;
- Why we fresh water flush our outboard cooling system – including examples of what will happen if we do not flush.
- Understanding the flow through the engine of the cooling water.
- Two methods of flushing the cooling system – on flushing muffs or using a flushing port.
- How long to flush your outboard engine.
- Advanced options for higher maintenance or to remedy weak flow.
Why Fresh Water Flush Our Outboard Cooling System?
The reality for all boat engines is they simply do not like salt water full stop. But most outboards are built to use water cooling so when on the sea you have no option. The salt is the greatest issue to your engine, but silt, mud, sand, shells, and brackish fresh water are also things to flush out of the cooling system.
To understand why the flushing is important, it may be easier to think of it like heart disease. All the things we know that clog up our unseen arteries we know are bad, but we do them anyway. There are things we can do to offset these with healthy diet and exercise etc. Your engine is the same, but we only need to flush it out with fresh water rather than take it to the gym and feed it broccoli!
The salt is the fat that blocks your arteries (water cooling galleries). To prevent the need for surgery, we clean out our outboard engines with fresh water after use to prevent the water galleries (arteries) becoming blocked. If we neglect the engine (heart) we will get hot spots (chest pain) or worse a full overheat (heart attack).
The salt in the water is also very corrosive and if left to dry out in the cooling system galleries, as well as blocking the flow of essential cooling water it corrodes the engine from the inside. When this salt dries it is rock hard and then becomes hard to move by fresh water flushing alone. It is important to remember that the water galleries around the engine are not readily accessible (like your arteries) and for the most part require expensive engineering work to repair. While it feels like a thankless task without a visual result, not flushing has a real – and often expensive – consequence, as the below pictures show.
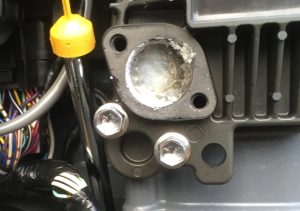
Figure 1 shows an anode protection ports on a one-year-old Suzuki outboard blocked with salt. The salt plug was about 4-5mm thick and is indicative of not flushing the engine. The good news is this was stuck to the sacrificial anode, if you look closely, you can see the shape of the anode in the salt. The bad news is after removing the anode the salt is clearly against the block and able to do its corrosive work.
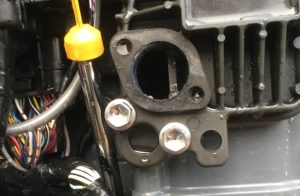
Figure 2 shows what the port looked like after our engineers cleared it out. No real harm done but only because it was cleaned out before corrosion could do more than discolour the surface of the block. All the anode protections ports on this engine had a similar salt plug.

The salt build up on the Yamaha engine in Figure 3 has accumulated between annual services. This is only here due to the complete absence of flushing with fresh water between services. That’s a lot of salt that does not need to be there.
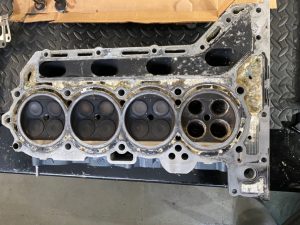
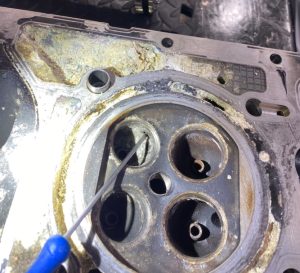
The next pictures show the damage to a far greater scale after years without flushing. The engine cylinder head in Figure 4 was about 12 years old and had been owned by one owner for the first eight years. The second owner fastidiously flushed with fresh water at a dry stack after each use but unfortunately the damage had been done in the early years and the blockages and corrosion took hold. In Figure 5 the blocked water cooling spaces can be seen clearly, it was a testament to Suzuki engineering that it ran at all without a catastrophic overheat. However, eventually the salt won and as also seen in Figure 5 it corroded through the casting behind the valve seat. It was this issue that started the investigation as the engine would not run properly with salt water mixing with the fuel. The owner was faced with a large bill to repair the engine with no promises that a similar issue would not happen in another cooling space on the powerhead but as yet unseen. Rather than risk further corrosion issues, the owner decided on the new engine option.
Now that we have established that lack of fresh water flushing of the engine can result in some very expensive but avoidable repairs, we need to look at preventative maintenance – or fresh water flushing.
Understanding The Cooling Water Flow
The below diagram shows a generic flow of the cooling water around an outboard engine. This includes all areas around the powerhead that are inaccessible as well as the larger and more serviceable areas. The “water intake” is on the gearbox where the flushing muffs are fitted. The flushing port location is not shown on this flow diagram but will be located around the “engine holder”. Note that the hoses/spaces after the thermostat are larger and can be reached more easily. When flushing we are more concerned with the areas we cannot reach in the powerhead, e.g. cylinders, crankcase etc.
Any outboard engineer will tell you that the powerhead is the area that causes any trouble; all the cooling system parts on the leg are easily accessible and are inspected, cleaned, and replaced as required during the annual service. Likewise, the hoses/spaces after the thermostat are larger and more accessible and therefore relatively inexpensive to reach.
Fresh Water Flushing Your Outboard Engine
There are generally two recognised methods of fresh water flushing your outboard engine:
- Use Flushing muffs on the lower leg water intakes and run the engine.
- Use the flushing port on the side or front of the engine and do not run the engine.
There is also the option of a tank of water or a flushing bag (a large strong bag filled with water to act as water tank). These methods essentially create full submersion of the gearbox to enable the cooling system to work as per full immersion when running normally, albeit only at low revs. This BLOG is not going to cover these options but will concentrate on the two listed above, which are the most appropriate for engines permanently attached to a hull and either in a yard, on a trailer, or on a berth/mooring.
Flushing With Flushing Muffs
Which Muffs?
There are generally three options on muffs:
- Round muffs – readily available at chandleries.
- Rectangular muffs – readily available at chandleries.
- Nose cone muffs – unlikely to be found in a chandlery, speak to your local dealer.
These all do the same thing – deliver cooling water to the engine using the complete cooling system – it is important to get the best fit for your gearbox water intake grills.
- The round muffs work well on smaller, more compact gearboxes but tend to be hard to seal on the larger ones that have bigger water intake grills.
- The rectangular muffs don’t always seal as well on smaller engines because they are too big but work well on a larger gearbox water intake grill.
- The nose cone options are currently for a very small number of modern engines, you should have been briefed on this at the point of purchase. If you don’t know if this applies to you its odds on you needn’t worry about these muffs.
The main thing is to get the right type for your engine – round for small engines and rectangular for large engines is a pretty good benchmark.
The Flushing Method
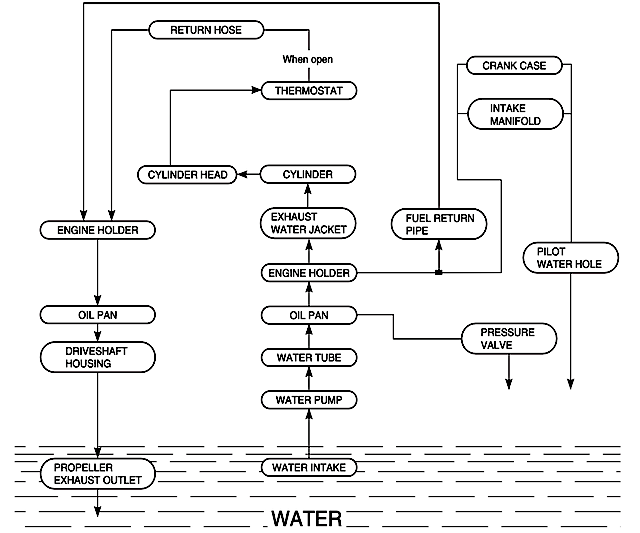
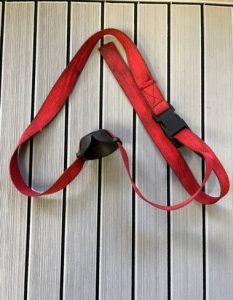
1. With the engine fully down put the muffs around the front of the gearbox (away from the propeller) and ensure that both the water intake grills on the side of the gearbox are fully covered. For the nose cone muffs they need to fit well and holes around the gearcase blocked up to prevent water escaping. See Figure 6 for examples.
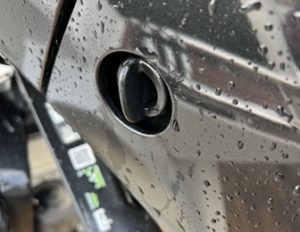
2. If you have a shallow water operation water cooling intake grill on the nose cone but are using muffs on the side grills, this will need to be covered up – masking tape will suffice if you do not have the correct tool as seen in Figure 7
3. Attach a hose to the muffs and turn it on. Initially, with good water pressure, it will often spray out from between the muffs and the gear case. Don’t worry this is normal.
4. Start the engine and leave it running in neutral. The spray at the muffs should now reduce as the water pump impeller is drawing the water.
5. If the tell-tale does not start shortly after the engine starting, block any holes where water is coming out on the leg, if this is just around the muffs just push them against the leg to improve the seal.
6. Once the tell-tale starts you can usually stop worrying about blocking leaks as the system is primed and generally maintains cooling.
7. Do not leave the engine unattended – a running engine can always be dangerous to the uninitiated.
8. Do not under any circumstances run the engine in gear. Apart from the clear risk of personal injury from a moving propeller, if the muffs move, they may entangle in the moving propeller. There is no reason to run the engine in gear while on muffs so do not be tempted.
9. Run on muffs for no more than 15 mins and only if no alarms sound – this cooling is adequate but is no match for full immersion as when in normal us.
10. When using muffs, because you run the engine, the thermostat will open once the engine gets hot. This allows cooling water to reach all areas, so it is important to run for no less than five minutes if you want the thermostat to open. As noted above the spaces after the thermostat are larger and therefore less prone to blockage but most importantly, they are accessible unlike the smaller water passages around the powerhead itself.
11. When finished, turn off the engine and then the hose and remove everything – including any tape you placed over any holes on the gearbox.
12. Leave the engine in the down position to drain out all the remaining water.
Flushing With The Flushing Port
This is by far the easiest method of flushing for an owner. It requires nothing more than a garden hose and the flushing port attachment to complete the flush. Some manufacturers have these built in (Figure 9) and others require you to fit them (Figure 10); no matter which this will be provided when you buy a new engine. This is also a quiet method as the engine must not be run with this method. This method will clean out all the spaces around the engine and if done immediately after running the thermostat will be open so you can flush those larger spaces described above as well.
Depending on your engine manufacturer, you will have one or more the flushing ports on the engine. It does not matter which you use as they all flush the cooling system, you do not need to use more than one port to complete a flush. The additional ports are simply for convenience on a modern engine so you can reach one from inside or outside the boat.
Finally, this method of flushing can be completed afloat with the engine trimmed down as it is only the areas around the powerhead that we are flushing out. This makes this a very useful option and does give no excuse for not doing it!
The Flushing Method
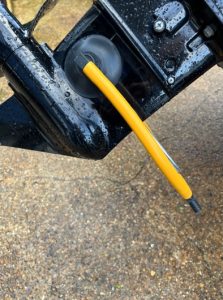
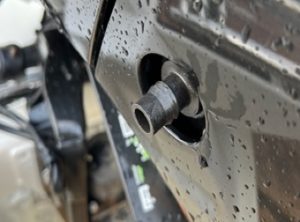
1. With the engine trimmed down identify the flushing port cap and remove it. (See Figure 8 Suzuki & Figure 9 Mercury)
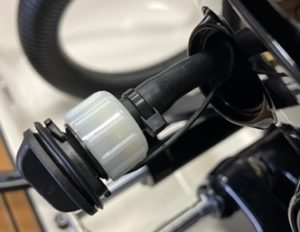
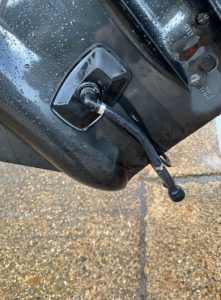
2. Attach the flushing attachment – this would have been provided by your dealer at purchase but if you do not have one, they are readily available. (See Figure 9 for the integral Mercury adaptor and Figure 10 for the Suzuki adaptor).
3. Fit your hose to the flushing attachment and turn on the water.
4. Do not start the engine. This flushing method is not providing a direct water supply to the water pump impeller in the lower leg; without sufficient water the impeller can overheat and break up or melt.
5. Run the water for at least five minutes but there are no restrictions as there is no risk of an overheat so if you want to do your jobs around the boat and then turn off that is fine.
6. When complete remove the flushing attachment and replace the flushing port cap and leave the engine down to allow the water to drain.
7. You must replace the flushing port cap, complete with the seal, – without it the cooling system will not work under normal operating conditions.
8. Now that you are worried about losing the cap – rest assured it floats!
How long to Flush?
There is no definitive one size fits all from the manufacturers about how long to flush for but no matter the chosen method they all advise flushing for at least five minutes. As noted above on muffs if you want the thermostat to open to get a full flush of the exhaust system, you’ll need the minimum of five minutes. You may not want to stay on muffs for too long (max 15 mins) due to the risk of an overheat. Using a flushing port, you are unrestricted.
The main thing is that you flush as often as possible, the more often you do this the less need there is to do it for longer periods. The manufacturer will recommend flushing after every use. Of all the manufacturers maintenance recommendations, it is this one that you should put the most effort into as it is a task that only the owner and users can influence. Occasional flushing is simply not often enough to prevent trouble downstream.
Advanced Options
If you have stubborn build-up of salt etc which is giving you a weak tell-tale, or occasional overheats all is not lost.
Acid can be used to clean out the inaccessible spaces around your outboard. This is harsh, and will work, but is a last option because it needs doing in a controlled environment and disposal needs to be environmentally friendly. This method may also damage seals etc. This all comes at a last resort cost, and you would be well advised to proceed in this direction with great caution.
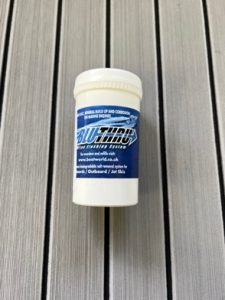
The far better option is Blue Thru which can be added in tablet form via a mixer kit when using either of the flushing methods described above. This option is non-toxic, biodegradable, non-hazardous and detergent free. It also coats the surfaces it passes over with a protective wax, with a corrosion inhibitor, and lubricates gaskets and seal.
We are so pleased with this product that we are now including it in all our winterisations for customers, and servicing if requested, to ensure they have the complete piece of mind that their engine is best prepared for the winter layup.
Manufacturers Recommendations
This is a generic BLOG. It is not possible to give all the details for all the various outboard manufacturers. It is important to check the maintenance notes in your outboard engine owner’s manual. The lengths of flushing times vary, as do the position of the flushing ports and the types of flushing muffs. This BLOG covers the broad process which can safely be applied to any outboard but for the best results get your owner’s manual out to check the fine details.
Marine Matters – Authorised Main Dealer
Marine Matters is based in Warsash, River Hamble, and are Authorised Dealers for both Suzuki and Mercury outboard engines. We service all makes and models of outboard engines either at our Warsash workshop or from our fully tooled mobile workshop. We have a professional and friendly team who are here to help you. Call the workshop on 01489 579 589 option 1.
